Pages

Wednesday, October 23, 2013

#dwh2 : The Lady Room Part One

When searching for the #dwh2 one one of the things on my list was a "lady room". Or as I've heard others call it a "sitting room". I think my term is more fun. So as we shall call it, the lady room.
I was really happy when we found the our house because it had the ultimate set up for said lady room. I haven't shared very many photos of this space because it wasn't to see. I just knew it had potential.
The room's walls were painted two shades of pink stripes. Which was really cool. But I've passed the phase where I want a pink room.  Had this come along about 8 years ago, I'd have been a happy camper. Alas, 8 years late. Also...a major NO for us....carpet. I was revealed that the under coating was raw concrete. Naturally, and realtor line is going to sound something like, "oh you can just replace it with hardwood." Well that ol' hardwood isn't in the cards right now. But perhaps sometime in the future. Should hardwood be installed it would have to be in several rooms not just this one and we'd have to replace the existing hardwood that's outside of this room.  Matching is not an option, it's really weird scrapped kind of red hardwood. (?? I know) Now back to this room....

Here it is about 2 weeks after we moved in. 

When we moved in I put all of my frames on this wall because I wanted them off the floor. 
I also wanted to see what it looked like.  As it turns out it was entirely overwhelming and something I didn't want to stay for longer than possible. Knowing that the room would get painted eventually I thought it was a harmless risk.


These photos were taken just before I started hauling 
everything out of the room to take the carpet up. 

The window to the right was covered. It had a really nice pair of white and pink silk drapes that would, again, have been great a few years ago but at this point not my cup of tea. The quality is so nice though, I hope we can use them in another space at some point. There was also a big cornice board that extended from the top of the wall to just past the top of the window. It was brown silk with pink flowers and had scalloped edges.  I really did try to figure out how to keep this as it is a nice piece. But again...same story 8 years go...SO it all came down.


And then I reached the magical point where I couldn't take it any longer.
And this happened. Which then meant that we had to go on and take all of it out. 
(I may or may not have done a little happy dance.)


Believe it or not taking the carpet up was the easy part. 
It was practically just laying there as though it was a rug on the floor. 
The padding likewise came up quite easily. 


Stay tuned for more on this room make over. 
Folks...as of today it looks completely different.

Monday, October 21, 2013

Memphis Fun : Tiger Madness

On Friday night I went to Tiger Madness with my Canadian husband and my Thai surrogate daughter.


This was a rather fun outing and my first "sporting event" as a Memphis Tiger. Having attended another highly acclaimed basketball school I had some expectations as to how Tiger Madness would go down. Tiger Madness is modeled after Late Night - which is to mark the first day the team can officially practice together. That date was earlier in October, none the less I am glad to support my new Tiger team as they start their new season. It was great to be in the Fed Ex Forum with thousands of other screaming, laughing fans. I was not only proud of the university community and all the students but I was also proud of the city of Memphis. Go Tigers, Go!

Saturday, October 19, 2013

#dwh2: Fans.

#dwh2 is a fixer-upper. However, I would not call this house a gut job. I know there were many people who did think so. Alas, we do not. It needs updating. That doesn't include removing every last particle. At least not within the first 5 minutes of living here.

We are slowly checking things off the list of "we can do it" tasks. One of them was to paint all of the fans in the pool. We've been trying to come up with a name for it other than pool room because that means to most people that we would play pool in there. We call it the pool room because it is a room with an indoor pool in it. That's hard to explain sometimes. #firstworldproblems

So, I give you the offending fan.


Brown, leafy, more black and a bad lantern.


The pool room has a lot of lighting. 
There are 10 bulb fixtures with round lanterns on them. I like them. 
There are also 8 recessed lights. 
And last but not least, 3 offending ceiling fans. 
...and a partridge in a pear tree. 


The lanterns that go all the way around the pool are original to the house. 
We really like them. So..let's see what we can do to build this in to the fans...

As you can see below, the lanterns have a certain (cough, cough) shape to them. 
...pointy, you know what I'm saying.


The name of the game as we've moved in has been "PAINT". 
We've painted so many things to help give it a new face. 
So when looking at the fans, this was the logical answer. 
I priced some new fans but that project rang up at about $950 including the electrician. 
I'm not so keen on spending that amount on fans. Not today, probably not ever.

AND....the reveal.


Thank the dear sweet spray paint lords that this worked out. 
It took A LOT of paint. Like....A LOT. 
For each fan it took approximately 2.5 cans of spray paint.
The fan blades are sizable but they really soaked up the paint. 
Also, they needed painted front and back because of the angle they are installed.

 Remember what they DID look like?

 
Yes, I was rather glad to have this little chore done and off the list. 
Next up in the pool room...
1. Give it a better name
2. Paint the rest of the room. (probably in the spring)


It took about 2-3 days per set of fan blades to paint them. 
So this project while seemingly easy, took a couple weekends to complete. 
I think that this really made a difference in the space. 
Changing out the lantern and painting the blades in total cost about $25 per fan. 
I'd like to paint the body of the fan too, though didn't this time. 
I kind of like it with the black body, so time shall tell. 

This room is the room in the house that needs the most work long term so ultimately the fan blades are a very small drop in the bucket (pool) but for now it seems quite lovely. 

We got about 3-4 big projects done over fall break last weekend. So I'm excited to share them with you as they finish up and come together later this week.


Thursday, October 3, 2013

A photo worth sharing.

I saw this photo on Bo & Dot today and it is simply to good not to share.


This photo is from Dubai.  While it is unlikely I will ever have the opportunity to travel there...
Can you believe this? It stopped my little browsing finger and I paused to marvel and say WOW. 

That is all. 
Happy Thursday. 

This is my favorite day of the week because it means tomorrow is Friday. 
Then it's the weekend.


Wednesday, October 2, 2013

#dwh2 : the blue bathroom

Before Tongta arrived in August we painted her room. It is Benjamin Moore electric blue. We love it. She loves it, everybody is happy. I highly recommend that color, it is very WOW.  In Tongta's rooms...Blue is the thing. Lots of blue, and in various shades of blue. Which is funny considering our house was in a movie called "50 shades of blue". Ha. hadn't thought of that before.


So now let's talk about Tongta's en suite bathroom. Her bathroom is the "blue bathroom". It has powder blue/light blue tile from the floor about 2/3 of the way up the wall. The tile is in really good shape. So no plans to take it out. The walls is painted the same color of blue the rest of the way up as is the ceiling. FORTUNATELY, all of the bathrooms in the house have tile all the way up to the ceiling. I am totally impressed that they did that when the house was built in 1960. That really helps curb the notion to take out the tile....did I already mention that the tile is in good shape (yes, yes!).

About 18 months ago I was at Seabrook paint store in Memphis and landed on a stack of black and white stripe wallpaper that was on major sale. The answer is "YES"... I bought all they had. At the time I knew I didn't have a spot for it but I knew there would be eventually. I actually even used it for a piece of furniture at our last house. I was so excited...I just had to use it for something!


That was fun! It really gave a different flare to this piece. 
I used a very small portion of the paper I bought. This was just a little practice.

NOW...back to the bathroom at #DWH2

Just as a reference here is some inspiration for the bathroom...

I originally found this picture on Google images but traced it back to this post.


I took this picture at the Kate Spade store in Memphis. 

I love their bathroom.  Their tile is a crisp white, but I think that it would still look cool with blue on the bottom. Adding in some additional shiny pieces such as a new faucet and other fixtures I think that will be a nice fresh start! I always go in there when I visit the store. I love to take a peak at that crisp white and dazzling shiny fixtures. The stripes sure are dandy.


Here is our blue bathroom as it is now. Styled up with some pink and gold. 
The ceilings are nice and tall so the stripes might be a nice touch. 
The counter is white marble, the sink is a nice shape so all of that is okay. 
I think a new faucet is in order. I've got a few in mind but nothing selected. 


 This bathroom has a really interesting layout, it's kind of an "L" shape. The bathtub is actually a separate portion. The bathroom and the toilet is on the other side of the wall with the pink towel (pictured above). You can also see the reflection of another door in the mirror...that's the space where the shower is. When you go through that door, you're in Tongta's room. So it's got variations of privacy. Nice option, eh?

Right now the striped wallpaper is in a bag in the bathroom, every day I get closer to calling somebody to have it applied.  However, after steaming wallpaper off 3 of the other bathrooms, it's an interesting thought to put up MORE wallpaper. Goodness, the dilemma.


Thursday, September 26, 2013

#dwh2 kitchen dreams

Over at #dwh2 we are making plans.  Checking things off the list...a little at a time. But mostly we are just making plans, changing them, re thinking them, changing them back...a couple weeks go by, we re think, then change them again...repeat, etc. So basically, we are making plans.

All of our plans for the next year-eighteen months will include paint and various stages of painting type projects. In about two years the construction portion may being...maybe. At this rate we are doing so much of the list/change list type of thing we may not be ready in two years.

I shared a couple of photos of the kitchen when we first moved in.  These first photos are from the listing. I don't think these rooms have been this tidy since before we moved in...just keeping it real.

So without another stall...here is the kitchen in our 1960 mid-century ranch-aganza.


The stove is kind of an oddity.  The range is 46 (oh shoot maybe it is 47") wide.  Guess how many ranges I can find that are that size. The list is small and the options are REALLY expensive. Lovely.
So that's on the list of considerations when there is a whole kitchen overhaul. Also, the double ovens are a weird size. I figured out that I like this configuration, the sizes in the overhaul will just have to be different...(sigh). Also, there is the whole part where we switch to a gas stove. Apparently that won't be a big deal given the stove location. That part is a relief.

If you look in the photo above, you will notice (well a lot of things) that the two bottom cabinets to the left of the double ovens have wheels on them.  We didn't notice this until we moved in. Those cabinets are faux and they actually pull all the way out leaving the counter as an optional bar space AND/OR leaving you with two serving carts. The tops are pretty and there are two shelves on the inside of each unit.  Neat-o!

Now, let's talk about the green floor. Most of the floors in our house are terrazzo. In the kitchen we have green laminate. We are 98.3% sure that it is concrete under the linoleum, not terrazzo. I'd love to pull up the laminate and live with whatever is under there. Imagine sealed or stained concrete! Yay.

Below is another view of the kitchen.


The green floor continues into the butler's pantry but is not in the walk in bar or the dining room.
So that's another space to remove both the wallpaper and the leolium. Oh by the way have I talked about the wallpaper yet? Yes, there is wallpaper everywhere. I mentioned in my last post that we removed paper in our bathrooms. The kitchen has not received said treatment yet. It is yet to be touched. Yet again, an example of the evolving/changing list. 


This is the laundry room. It is off the kitchen.  To the left in this photo is a full bathroom. As you can see. The green linoleum continues into this space.  To the right you can see the concrete floor. I'd love to stain and seal it. That might be fun/neat/an option.


Because we are not ready to "gut" the kitchen we need to work with the cabinets we have, which are very lovely by the way. They are custom made and are in really good shape. As of about 2 hours ago, my list for the kitchen included remove wallpaper and linoleum and paint the walls white. I also had a big question mark next to paint the cabinets white. After seeing this photo, with practically the same cabinets, I am temporarily scratching off the painted cabinets for now. This is a nice option including all of the mentioned elements.


Now then...perhaps this is an option or perhaps by this time tomorrow I will have another plan in place.  This is the problem for me...#firstworldproblem I know.


Monday, September 23, 2013

Paint in the Hall (and bedroom)


For me this house was love at first sight. As I may have mentioned in previous posts about #dwh2, when we found this house, we had been looking at houses for almost 2 years.

It has a fabulous layout, good sized rooms, a good number of potties (a requirement of mine), and naturally the indoor swimming pool didn't hurt. One thing that this house needed was some serious TLC. And eventually down the road, all new bathrooms, a kitchen and work to various other components of the house (womp, womp). For now, the answer is paint!

We painted a guest room about two months ago, alas it is a guest room no more. Our international daughter lives in that room now. We wanted to get her room set up before her arrival so she'd be good to go. Now...it's time to start working on our rooms.

First up...Our bedroom and the master wing hallway.

I don't have a lot of photos of these two rooms. One reason...the paint was so dark it was actually hard to photograph. I do have a few photos, and they are some strictly of the room, others with the room as the background.


A Saturday morning photo of G and Handsome. 
Notice the paint swatches on the wall in the photo above and below.
 This is probably the best photo of the green paint. 
It gives the best, true to form, view of what color it actually was. 

Now...it's time for primer.


Keeping it real folks...
Our bedroom right now is a mess. 

There was a lot of prep work between these two spaces.
All of the electrical plates and air vents had to be replaced. 
They were a combination of miss-match  and/or painted over (which I'm against). 
Between the two spaces, that is a total of 16 plates. (yeaaahh)


You may have noticed the super charming lighting in the bedroom. 
Yeah, that's going to be addressed at some point on a larger scale. 
Right now, it's being addressed by keeping them off and using lamps. 
Fortunately the floor to ceiling windows/door on one end provide a lot of natural light. 


After primer, we are left with a lovely, white that has a slight tint of blue/grey. 
The prep/priming process took a while. 
We did not do this job ourselves, we had it done. 
There were to many components and far to much space for us to be able to do it ourselves. 
I'm glad to have it all fixed and looking fresh. 
I am a broken record...paint surely can change things. 


And now for the hallway. 

Also the same shade of burnt avacado green. 

dark.dark.dark. 

(the entry way paneling is getting painted soon)


 I was so happy to see the primer I nearly told the painter to add another coat and just stop there. 
Alas, this was not the final color.


This hallway is fairly long and has 4 closets and doors to the entry way, 
to the dressing room and to our bedroom.
 In case you were wondering...
There are 11 doors in this hallway. 
Though this space is very dark, this is why I didn't stop with white for this space. 

The after is my favorite transformation thus far.


I had class this weekend and when I came home from class late on Friday night Geoff and I took the wallpaper off our his/her bathrooms. Both bathrooms had wallpaper that were of a dessert/passport theme. Geoff's had camels and other safari animals with a brown backdrop and mine was a blush, dusty pink with passport stamps on it. Fortunately we had the paper off in about an hour or just a little more. (Thank you info-mercial steamer we purchased on a whim). On Saturday night when I got home, I took the paper off one of the other bathrooms. It even had paper on the ceiling (gulp). It's the smallest bathroom so it took about 30  minutes. Again, thank you super steamer.

The bathrooms and my dressing room are up next for paint. 
Then possibly the entryway and the kitchen...Oh geez I don't know. Only time will tell. 
There is still a lot of work to do in the master bedroom but for now, the paint is an excellent step in the right direction!

Monday, September 9, 2013

#DWH2: ENTRY WAY

We have been in the house now for about a week over 3 months. The painting has begun.
We started off this movement by painting a guest room (now Tongta's room) before she arrived in early August. That is now spreading to other portions of the house. The first area to receive attention is the entry way.

The entry way feeds into the living room of the house where I spend a large portion of my time teaching music lessons. SO, this was important to get a start on. The entry way and the living room have dark, hardwood paneling. The paneling is in really good shape and is original to the 1960 house. Remember, mid century mod. I had hesitation about painting it because of the style of the house. So if anything is to be painted, it had to be done right...right? So the decision has been made to paint ONLY the paneling in the entry way and leave the paneling in the living room as is (for now).
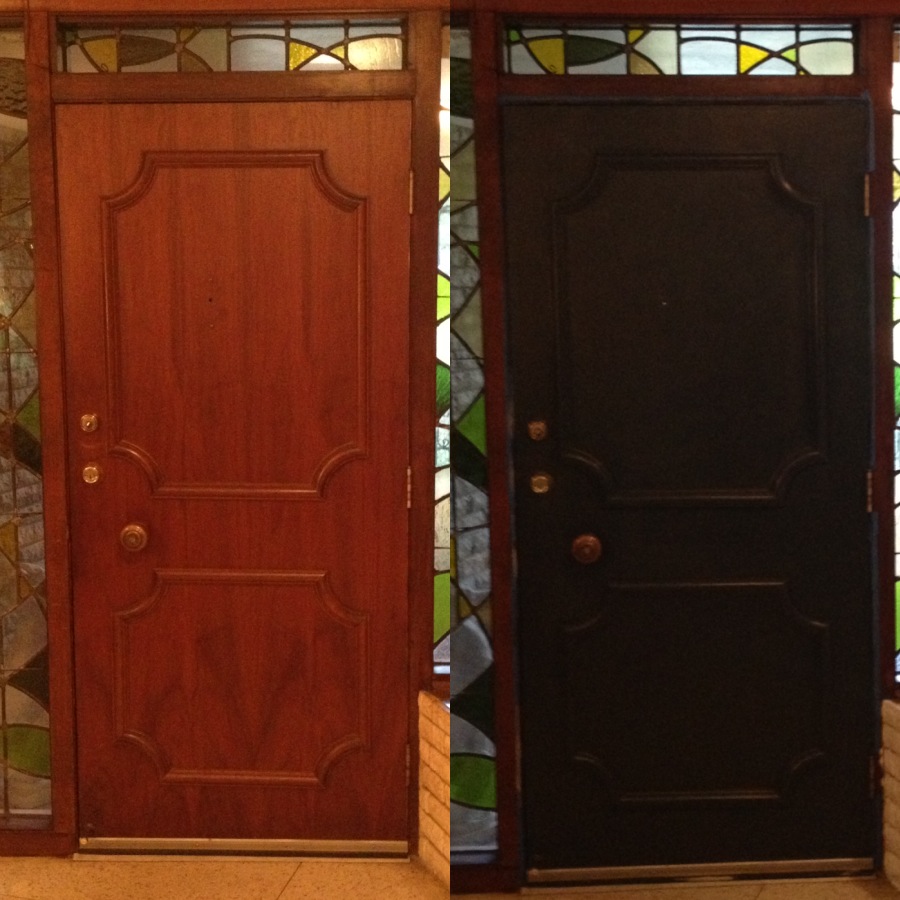
Along with the entry way paneling, the front door, trim and entry way brick will also get a fresh coat of paint.

So...now...the pictures...


This avocado green color is down the hallway of the master wing and is also the wall color in the master bedroom.  It makes me nervous. Question: Can a paint color really do that to you? Answer: Yes.  The palate for paint colors at #dwh1(as well as our place in downtown Memphis, and our first house in Lawrence, Kansas) were shades of gray/grey. These colors do not make me "nervous". I enjoy them muchly.  So, above are variations of colors to not only replace the green, but also for the entry way, the trim, and the two master bathrooms. (There's wallpaper in there...more on that, laterish.)

There she is...the FRONT DOOR. 

The front door feeds towards a brick wall that is continuous from the outside portion of the gated entryway. The brick is sort of a khaki color and is untouched on the inside. No stains, paints, etc. 


 First step, brick and mortar primer.  Fortunately, this part of the job is white, so it gave us a little bit of a preview to what we had in store. Painting the brick was a fairly simple task. Though, coating it for the first time did take a while. The brick absorbed the primer quickly, as predicted.

After a few practice coats, we were on track and away we went.

 Before we painted the brick we started the process of painting the front door. 
Step 1: Primer.

 This made a big difference. Really brightened up the dark entry. At this point, I felt pretty good about the whole paint the front door black part of the weekend until....

We actually started painting it black.  GOOOOOD LORD this part was frightening. Yes, I know it is black paint and it takes a few coats but like I said above GOOOOOD LORD. This part was kind of a low point. We persevered and got a coat of black paint on the door before bed on Saturday night.


 The next morning I woke up to this. 
And...I felt better. Kind of.

After church we resumed our little project. 
Another coat of black paint for the front door and while it was drying we began the bulk of the brick work. Geoffrey started up high, I did the bricks down below.


 By the end of the day we were left with white brick (primed) and a mostly black front door.

 We felt good about this change. 
Definite freshness in the space.


The color we selected for the front door was in conjunction with the lead pains between the stained glass. Normally, I would have chosen a tad different shade of black (darker and more black) but this shade fit the bill for this project.  There are portions of the day that the door reads dark, dark navy blue and sometimes charcoal. Bottom line, it is a nice change and really highlights the stained glass. Should this blueness continue, I may pick up something darker. But it's okay for now. All exploratory.

 Before and After


Because of the success of the primed white brick we decided to continue on with the vision of an all white entry. The trim around the front door as well as the wood paneling and all 7 doors (yes 7) in the entry way will be painted white.  

So, just imagine...

Then we thought....while we're at it perhaps we should paint the brick in the living room.

So...The brick in the living room will also be primed and painted (eventually).


The absolute next portions of the house to be painted are the master bedroom and master bathrooms.
(Hopefully in the next 10 days or so.) I am so ready for this little change.

It will make me clap my hands and shriek for joy. That's right, just like a little child.

So, until then...TTFN!

LinkWithin

Related Posts Plugin for WordPress, Blogger...